Showing posts with label IT. Show all posts
2018/06/01

Shutting Down an AHV Cluster for Maintenance or Relocation

Posted in by HungNguyen | Edit

Description

You might need to shut down an AHV cluster to perform maintenance or tasks such as relocating hardware.
To shut down all hosts in an AHV cluster, perform the following steps.
Note: Upgrade to the most recent version of NCC before proceeding with the following steps.

Solution

Shutting down an AHV cluster​

To shut down all hosts in an AHV cluster, perform the following:
  1. Prior to the scheduled shutdown, SSH to a Controller VM and run ncc health_checks run_all.  If there are any errors or failures, contact Nutanix Support.
  2. Shut down all the user VMs in the Nutanix cluster.
  3. Stop all AFS cluster VMs if applicable
  4. Stop the Nutanix cluster.
  5. Shut down each node in the cluster.
  6. After completing maintenance or other tasks, power on the nodes and start the cluster.

Shutting down guest VMs​

Guest VMs can be powered off in 3 ways:
  • Power off the guest VM from within the guest OS.
  • From Prism, go to VM > Table. 
    • Select each guest VM and clcik the Power Off Actions.
  • If there are a large number of VMs to shut down, perform the following tasks to power them off by using aCLI:
    • SSH into any Controller VM in the cluster.
    • Shut down all non Controller VMs.
      • nutanix@CVM$ for i in `acli vm.list power_state=on | awk '{print $1}' | grep -v ^VM$` ; do acli vm.shutdown $i ; done
    • Confirm that all VMs are powered off:
      •  vm.list power_state=on
    • If any VMs are on, consider powering them off through the guest OS.  To force power-off through AHV use the following:
      •  vm.off

 Shutting down AFS (file server) VMs

  • Please see KB-4429 for version specific details.

(Data Protection) Ensure there are no on-going replications if running Async DR Protection Domains:

  • For Async DR: Ensure no schedules or replications are running by executing the following command from any Controller VM. If there are on-going replications, wait until they are complete before proceeding.
    nutanix@cvm$ ncli pd ls-repl-status

Stopping the Nutanix Cluster

Log on to any Controller VM using SSH with the Nutanix credentials and run the following command to stop the Nutanix cluster:
  • nutanix@CVM$ cluster stop
Confirm using that the command has stopped the services successfully before continuing.

Shutting down the Controller VMs
Perform the following on each AHV host.
  1. virsh list
  2. virsh shutdown

Shutting down each node in the cluster

Perform the following steps for each node in the cluster you have stopped.
  1. Log into the IPMI web console on each node.
  2. Under Remote Control > Power Control, select Power Off Server - Orderly Shutdown to gracefully shut down the node.

      3. Confirm that the AHV hosts are no longer powered on or pingable.

Powering on the nodes and cluster after a shutdown

Perform these steps for each node in the cluster.
  1. If the host is powered off, turn it on by pressing the power button on the front of the block for the host.
  2. ​Log in to each host's IPMI interface.  Confirm that the host is powered on. 

Start the cluster

  1. All Controller VMs start automatically after the node powers on.  Wait approximately 5 minutes after the last node is powered on to allow services to begin.
  2. Log on to any one Controller VM in the cluster with SSH using Nutanix credentials.  
  3. Start the Nutanix cluster by issuing the following command: 
    nutanix@cvm$ cluster start
  4. Confirm that the cluster services are running:
    nutanix@cvm$ cluster status
  1. Power on the guest VMs.  
    • From the Prism web console, navigate to Home > VM and select the Table view.  
  2. If a large number of VMs need to be powered on, type the following aCLI command to power on the VMs:
    • nutanix@cvm$ for i in `acli vm.list power_state=off | awk '{print $1}' | grep -v ^VM$` ; do acli vm.on $i; done
  3. Confirm that all VMs are powered on.
2016/08/30

Configuring Postfix as front-end Mail Transport Agent to Exchange 2010

Posted in by HungNguyen | Edit

The last time my client uses Windows Small Business Server, I had them bought Trend Micro Client Server Messaging Security for Small and Medium Business. It was quite costly; around $1200 for 15 users includes 2 years maintenance. It made sense then, because his settings makes it easy to manage and maintain and virus protect all the PCs in the network from one centralized place. Moreover, it also has virus and anti spam for Exchange.
My new client has only Windows Exchange 2010 that’s running in data center. Having an “enterprise” (read expensive) spam and anti virus was not an option for him. The only way to cut costs is by using Linux or the likes. Alas, the client just wants Exchange somehow. So I get to think, why don’t we have Linux box running Postfix as a front-end Mail Transfer Agent (MTA) to MS Exchange 2010. Below is the diagram of what I’m trying to achieve.


Installing and configuring Postfix

So the first thing that needs to be done is to have a Linux box that’s ready to accept incoming mail and run diagnostic on it. I’ll be using my favorite distribution, Ubuntu. I’ll assume that you have one already installed.
First, let’s intall Postfix by running the command below. Since we’ll be using it only to forward emails to Exchange, it doesn’t really matter what configuration to pick. Simply accept the defaults.
user@mydomain:~$ sudo apt-get install postfix 
Once everything is installed, edit /etc/postfix/main.cf and add/adjust the values to your specific configuration. Here’s the relevant config from main.cf file that I have.
user@mydomain:~$ cat /etc/postfix/main.cf
mydomain = mydomain.com
myhostname = postfix.mydomain.com
mydestination = mydomain.com, myotherdomain.com
mynetworks = 127.0.0.0/8 [::ffff:127.0.0.0]/104 [::1]/128
relay_domains = $mydestination
smtpd_recipient_restrictions = permit_mynetworks,\
 reject_unauth_destination,reject_invalid_hostname,\
 reject_unauth_pipelining,reject_non_fqdn_sender, \
 reject_unknown_recipient_domain,reject_unknown_sender_domain
transport_maps = hash:/etc/postfix/transport
local_recipient_maps = 
The last line is to force Postfix to not lookup local recipient. This way, Postfix will accept all mails address to the destination domain(s). The alternative is to either export Exchange mailbox every time there are changes there, or to configure Postfix to query Active Directory. I don’t like querying Active Directory as it’s another overhead and if the server is attacked for whatever reasons, there could be a lot of queries going to Exchange. Importing users every time there are changes on Exchange would be the next improvement. I’ll leave it to you, the reader, as an excercise.
The next thing to do is to configure the transport DB. Edit /etc/postfix/transport and add each domain that you want to forward. Here’s a sample how the file look like.
user@mydomain:~$ cat /etc/postfix/transport
mydomain.com      smtp:[10.10.10.50]
myotherdomain.com     smtp:[10.10.10.50]
What it does is, it tells Postfix to forward mails on the 2 above domains through SMTP to an email host at IP 10.10.10.50. In this case, that IP address happens to be an Exchange 2010 server. Don’t forget to build database so that Postfix can start using it. You need to do that for pretty much every file that’s marked as hash: in main.cf Postfix configuration. Also refresh Postfix so that it’ll take the new configuration.
user@mydomain:~$ sudo postmap /etc/postfix/transport
user@mydomain:~$ sudo postfix reload
Now it’s a good time to test your Postfix configuration, making sure it’s forwarding email to Exchange. You can test sending email manually using telnet.

Configure SpamAsassin

Now that you’ve made sure that Postfix is working fine and emails received to it is forwarded to Exchange, it’s time to configure it to start filtering email. Install the necessary packages by running the following commands:
user@mydomain:~$ sudo apt-get install amavisd-new spamassassin clamav-daemon
user@mydomain:~$ sudo apt-get install libnet-dns-perl pyzor razor
user@mydomain:~$ sudo apt-get install arj bzip2 cabextract cpio file gzip 
user@mydomain:~$ sudo apt-get install lha nomarch pax rar unrar unzip zip
user@mydomain:~$ sudo adduser clamav amavis
user@mydomain:~$ sudo adduser amavis clamav
Next, we need to configure SpamAsassin. Edit /etc/default/spamassassin and enable SpamAsassin and CRON. Leave everything else as is. Below is the relevant changes of the file.
user@mydomain:~$ cat /etc/default/spamassassin
ENABLED=1
CRON=1
Then start SpamAsassin.
user@mydomain:~$ sudo /etc/init.d/spamassassin start
Optionally, you can also configure SpamAsassin to tag email’s header with the word *****SPAM*****. In order to do that, edit /etc/mail/spamassassin/local.cf and uncomment the line where it says rewrite_header Subject.

Configure Amavis

Amavis is the anti virus that we’ll use. It works in conjunction with SpamAsassin. Now that it is installed, we’ll just need to enable it. Edit /etc/amavis/conf.d/15-content_filter_mode. Uncomment the 2 config to enable it. Your file should look like below:
user@mydomain:~$ cat /etc/amavis/conf.d/15-content_filter_mode
use strict;

# You can modify this file to re-enable SPAM checking through spamassassin
# and to re-enable antivirus checking.

#
# Default antivirus checking mode
# Please note, that anti-virus checking is DISABLED by 
# default.
# If You wish to enable it, please uncomment the following lines:


@bypass_virus_checks_maps = (
   \%bypass_virus_checks, \@bypass_virus_checks_acl, \$bypass_virus_checks_re);


#
# Default SPAM checking mode
# Please note, that anti-spam checking is DISABLED by 
# default.
# If You wish to enable it, please uncomment the following lines:


@bypass_spam_checks_maps = (
   \%bypass_spam_checks, \@bypass_spam_checks_acl, \$bypass_spam_checks_re);

1;  # ensure a defined return
If your Linux host name is not fully qualified domain name (FQDN), then edit /etc/amavis/conf.d/05-node_id and specify your hostname manually. Let’s have Exchange 2010 handle the final action of spam / virus email. Postfix / Amavis / SpamAsassin job is basically to tag emails whether they are spam or virus. That way, Exchange 2010 still have the final say what to do with them.
user@mydomain:~$ cat /etc/amavis/conf.d/05-node_id
$myhostname = "postfix.mydomain.com";
user@mydomain:~$ cat /etc/amavis/conf.d/50-user
$final_virus_destiny      = D_PASS; # (defaults to D_BOUNCE)
$final_spam_destiny       = D_PASS; # (defaults to D_REJECT)
Then restart Amavis.
user@mydomain:~$ sudo /etc/init.d/amavis restart
Before we hook Amavis to Postfix, let’s make sure Amavis is running and working fine. To do that, simply telnet to port 10024. Below is my telnet session when testing it.
user@mydomain:~$ telnet localhost 10024
Trying 127.0.0.1...
Connected to localhost.
Escape character is '^]'.
220 [127.0.0.1] ESMTP amavisd-new service ready
^]

telnet> quit
Connection closed.

Connect Amavis and Postfix

Now that we have confirmed that Postfix is working fine and Amavis is also working fine, let’s have them work together. The first command tells Postfix to use Amavis for content filtering. Then you also need to edit /etc/postfix/master.cf which I’ve shown the relevant changes below. Restart Postfix after everything is done.
user@mydomain:~$ sudo postconf -e "content_filter = smtp-amavis:[127.0.0.1]:10024"
user@mydomain:~$ cat /etc/postfix/master.cf
pickup    fifo  n       -       -       60      1       pickup
         -o content_filter=
         -o receive_override_options=no_header_body_checks
smtp-amavis     unix    -       -       -       -       2       smtp
        -o smtp_data_done_timeout=1200
        -o smtp_send_xforward_command=yes
        -o disable_dns_lookups=yes
        -o max_use=20

127.0.0.1:10025 inet    n       -       -       -       -       smtpd
        -o content_filter=
        -o local_recipient_maps=
        -o relay_recipient_maps=
        -o smtpd_restriction_classes=
        -o smtpd_delay_reject=no
        -o smtpd_client_restrictions=permit_mynetworks,reject
        -o smtpd_helo_restrictions=
        -o smtpd_sender_restrictions=
        -o smtpd_recipient_restrictions=permit_mynetworks,reject
        -o smtpd_data_restrictions=reject_unauth_pipelining
        -o smtpd_end_of_data_restrictions=
        -o mynetworks=127.0.0.0/8
        -o smtpd_error_sleep_time=0
        -o smtpd_soft_error_limit=1001
        -o smtpd_hard_error_limit=1000
        -o smtpd_client_connection_count_limit=0
        -o smtpd_client_connection_rate_limit=0
        -o receive_override_options=no_header_body_checks,no_unknown_recipient_checks
user@mydomain:~$ sudo /etc/init.d/postfix reload

Test if everything is working as it should

Now let’s test sending spam email by hand using telnet. We’ll be using Generic Test for Unsolicited Bulk Email (GTUBE) from SpamAsassin. What’s expected is that we’ll receive email from Exchange through either Outlook or Outlook Web Access. Here’s the transcript of my spam email test.
user@mydomain:~$ telnet localhost 25
Trying 127.0.0.1...
Connected to localhost.
Escape character is '^]'.
220 postfix.mydomain.com ESMTP Postfix (Ubuntu)
ehlo postfix.mydomain.com
250-postfix.mydomain.com
250-PIPELINING
250-SIZE 10240000
250-VRFY
250-ETRN
250-STARTTLS
250-ENHANCEDSTATUSCODES
250-8BITMIME
250 DSN
mail from: somedude@spammer.com
250 2.1.0 Ok
rcpt to: user@mydomain.com
250 2.1.5 Ok
data
354 End data with .
Subject: Test sending spam email.

This email should be marked as spam because it contains this line

XJS*C4JDBQADN1.NSBN3*2IDNEN*GTUBE-STANDARD-ANTI-UBE-TEST-EMAIL*C.34X

I should expect this to be delivered to Exchange.
.
250 2.0.0 Ok: queued as CDF272A80E20
quit
221 2.0.0 Bye
Connection closed by foreign host.
If you check the logs, you should see log messages resembling the below:
user@mydomain:~$ tail -f /var/log/syslog
Apr 15 00:19:03 postfix.mydomain.com postfix/cleanup[6059]: CDF272A80E20: me
ssage-id=<20130415071754 .cdf272a80e20="" postfix.mydomain.com="">
Apr 15 00:19:03 postfix.mydomain.com postfix/qmgr[5190]: CDF272A80E20: from=
, size=552, nrcpt=1 (queue active)
Apr 15 00:19:05 postfix.mydomain.com postfix/smtpd[6053]: disconnect from lo
calhost[127.0.0.1]
Apr 15 00:19:18 postfix.mydomain.com postfix/smtpd[6069]: connect from local
host[127.0.0.1]
Apr 15 00:19:18 postfix.mydomain.com postfix/smtpd[6069]: 404F42A80E2B: clie
nt=localhost[127.0.0.1]
Apr 15 00:19:18 postfix.mydomain.com postfix/cleanup[6059]: 404F42A80E2B: me
ssage-id=<20130415071754 .cdf272a80e20="" postfix.mydomain.com="">
Apr 15 00:19:18 postfix.mydomain.com postfix/qmgr[5190]: 404F42A80E2B: from
=, size=1294, nrcpt=1 (queue active)
Apr 15 00:19:18 postfix.mydomain.com postfix/smtpd[6069]: disconnect from lo
calhost[127.0.0.1]
Apr 15 00:19:18 postfix.mydomain.com amavis[5485]: (05485-06) Passed SPAM, L
OCAL [127.0.0.1] [127.0.0.1]  -> , 
quarantine: j/spam-jq58tLC6RLYB.gz, Message-ID: <20130415071754 .cdf272a80e20="" postfix.mydomain.com="">, mail_id: jq58tLC6RLYB, Hits: 1000.207, size: 552, que
ued_as: 404F42A80E2B, 14398 ms
Apr 15 00:19:18 postfix.mydomain.com postfix/smtp[6065]: CDF272A80E20: to=, relay=127.0.0.1[127.0.0.1]:10024, delay=93, delays=79/0.0
1/0.01/14, dsn=2.0.0, status=sent (250 2.0.0 from MTA([127.0.0.1]:10025): 25
0 2.0.0 Ok: queued as 404F42A80E2B)
Apr 15 00:19:18 postfix.mydomain.com postfix/qmgr[5190]: CDF272A80E20: remov
ed
Apr 15 00:19:18 postfix.mydomain.com postfix/smtp[6070]: 404F42A80E2B: to=, relay=10.10.10.50[10.10.10.50]:25, delay=0.21, delays=0.0
1/0.01/0.01/0.18, dsn=2.6.0, status=sent (250 2.6.0 <20130415071754 .cdf272a="" 80e20="" postfix.mydomain.com=""> [InternalId=21972] Queued mail for delivery)
Apr 15 00:19:18 postfix.mydomain.com postfix/qmgr[5190]: 404F42A80E2B: remov
ed
Now do check your Outlook and see if you receive a new message with subject starting with “*****SPAM*****” (if you’ve configured the optional step). Next up is configuring MS Exchange 2010 so that it’ll deliver the mail to “Junk E-Mail” folder.

Configuring Exchange 2010 to understand emails marked as spam from SpamAsassin

Exchange 2010 has some sort of mail filtering capability. In particular, it has spam confidence level; a number between -1 and 10. We’ll utilize that so that so that down stream, Exchange will work as intended (i.e. delivering junk mails to “Junk E-Mail” folder).
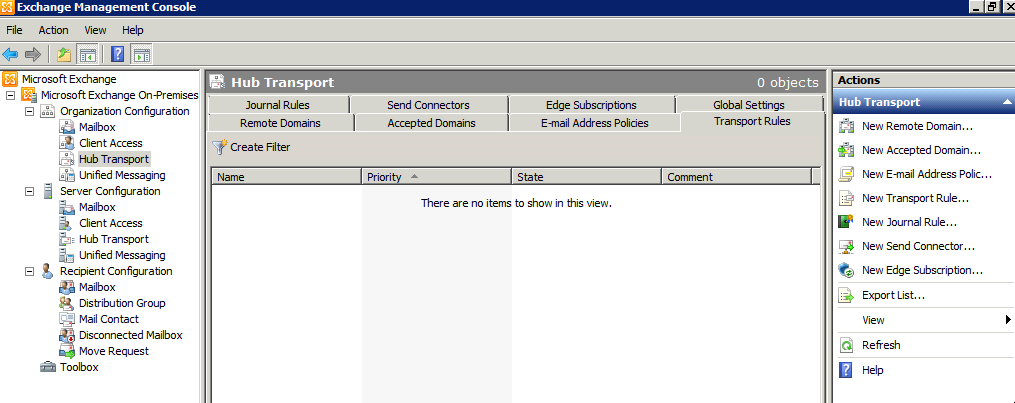
On your Exchange Management Console, browse to Microsoft Exchange On-Premises. Then expand Organization Configuration. Then select Hub transport. Navigate to Transport Rules tab. You should see an empty list like in the screenshot below.
  • Click on New Transport Rule from the menu on the right pane.
  • Give it a descriptive name like Mark as spam. Then click Next
  • On Conditions step, check “when the message header contains specific words
  • Click on message header and put in “X-Spam-Flag”
  • Click on specific words and put in “YES”. Then click Next.
  • On Actions step, select “set the spam confidence level to value
  • Click on “0” and change it to 6. MS Exchange 2010 has 6 as the highest confidence level that they’ll deliver. Otherwise, they’ll start quarantine
  • Ater clicking Next, you’ll get the Exception step. There’s nothing to do on this step. Simply click Next
  • On the last screen, simply click New button.
 
That’s it. You can try sending spam test email again. This time, you should have the email delivered to your “Junk E-Mail” folder instead of your inbox in your Outloo.

From http://www.microshell.com/sysadmin/configuring-postfix-spamasassin-amavis-as-front-end-to-ms-exchange-2010/7/


2016/07/14

Cài đặt phần mềm Rocket.Chat

Posted in by HungNguyen | Edit

Thời gian gần đây, mình tìm kiếm một chương trình chat nội bộ trong công ty để thay thế skype với các tính năng như Chat, gởi file, share screen, call, video call, ...  có application trên Windows, Mac OSX, Linux, Android, iOS

Hôm nay mình sẽ hướng dẫn chi tiết cách setup phần mềm Rocket.Chat trên hệ điều hành Ubuntu 14 với tên miền http://www.livemeeting.vn

Cài đặt Free Certificate Let's Encrypt

sudo git clone https://github.com/letsencrypt/letsencrypt /opt/letsencrypt
cd /opt/letsencrypt
./letsencrypt-auto certonly --standalone --email nvhung2@ppj-international.com -d www.livemeeting.vn

Cài đặt Nginx

sudo apt-get install nginx
cd /etc/nginx/sites-available
sudo mv default default.bak

Tạo file default mới với nội dung

sudo nano /etc/nginx/sites-available/default

 server {
   listen 443 ssl;
   server_name www.livemeeting.vn;
   ssl_certificate /etc/letsencrypt/live/www.livemeeting.vn/fullchain.pem;
   ssl_certificate_key /etc/letsencrypt/live/www.livemeeting.vn/privkey.pem;
   ssl_protocols TLSv1 TLSv1.1 TLSv1.2;
   ssl_prefer_server_ciphers on;
   ssl_ciphers 'EECDH+AESGCM:EDH+AESGCM:AES256+EECDH:AES256+EDH';
   root /usr/share/nginx/html;
   index index.html index.htm;
   # Make site accessible from http://localhost/
   server_name localhost;
   location / {
     proxy_pass http://www.livemeeting.vn:3000/;
     proxy_http_version 1.1;
     proxy_set_header Upgrade $http_upgrade;
     proxy_set_header Connection "upgrade";
     proxy_set_header Host $http_host;
     proxy_set_header X-Real-IP $remote_addr;
     proxy_set_header X-Forward-For $proxy_add_x_forwarded_for;
     proxy_set_header X-Forward-Proto http;
     proxy_set_header X-Nginx-Proxy true;
     proxy_redirect off;
   }
 }
 server {
   listen 80;
   server_name www.livemeeting.vn;
   return 301 https://$host$request_uri;
 }

sudo service nginx stop
sudo service nginx start

Nâng cấp hệ thống 

sudo apt-get update && sudo apt-get -y upgrade
sudo apt-get install -y software-properties-common git nano curl build-essential

Cài Nodejs

sudo apt-get install -y nodejs npm
sudo npm install nave -g
sudo nave usemain 0.10.43

sudo npm install pm2 -g
sudo pm2 startup

Cài Meteor

curl --location https://install.meteor.com | sudo bash -

Cài Mongodb

sudo apt-key adv --keyserver keyserver.ubuntu.com --recv 7F0CEB10
echo 'deb http://downloads-distro.mongodb.org/repo/ubuntu-upstart dist 10gen' | sudo tee /etc/apt/sources.list.d/mongodb.list
sudo apt-get update
sudo apt-get install --yes mongodb-org

Setup Mongodb replica

sudo nano /etc/mongod.conf 
đối với Mongodb 2.4:

replSet=001-rs 

Mongodb 2.6 hoặc cao hơn

replication:
          replSetName:     "001-rs"
sudo service mongod restart
sudo mongo
>rs.initiate()

nếu ra được kết quả như bên dưới là ok
{
        "info2" : "no configuration explicitly specified -- making one",
        "me" : "vps:27017",
        "info" : "Config now saved locally.  Should come online in about a minute.",
        "ok" : 1
}

Nếu báo lỗi như bên dưới, mở /etc/mongod.conf đổi bind_ip to 0.0.0.0

"errmsg" : "couldn't initiate : can't find self in the replset config"

Cài đặt Rocket.Chat

Download bản mới nhất
curl -L https://rocket.chat/releases/latest/download -o rocket.chat.tgz
tar zxvf rocket.chat.tgz
mv bundle Rocket.Chat
cd Rocket.Chat/programs/server
npm install
cd ../..
export ROOT_URL=http://www.livemeeting.vn:3000/
export MONGO_URL=mongodb://localhost:27017/rocketchat
export PORT=3000
node main.js

Tạo script tự khởi động phần mềm

cd /home/administrator/Rocket.Chat
sudo nano rocket-chat.json

{
  "apps": [{
  "name": "rocket.chat",
  "script": "/home/administrator/Rocket.Chat/main.js",
  "out_file": "/home/administrator/Rocket.Chat/logs/app.log",
  "error_file": "/home/administrator/Rocket.Chat/logs/err.log",
  "port": "3000",
  "env": {
  "MONGO_URL": "mongodb://localhost:27017/rocketchat",
  "MONGO_OPLOG_URL": "mongodb://localhost:27017/local",
  "ROOT_URL": "http://www.livemeeting.vn:3000",
  "PORT": "3000"
  }
  }]
}

sudo mkdir /home/administrator/Rocket.Chat/logs
sudo pm2 start rocket-chat.json
sudo pm2 save


Đăng ký account Administrator

Mở trình duyệt, gõ địa chỉ https://www.livemeeting.vn/
Mặc định, account đăng ký đầu tiên sẽ là account có quyền Administrator
2015/07/10

Command Line to Monitoring Linux Server

Posted in by HungNguyen | Edit

Glances Complete Linux server Monitoring Tool

Công cụ để theo dõi Perfomance, tương tự Task Manager trên Windows
Cài đặt trên Ubuntu 14.04
#sudo apt-get install glances
#glances


2011/11/09

Mac OS X Lion lỗi

Posted in , , by HungNguyen | Edit
Sáng, mở document ra để sắp xếp lại cho gọn gàng thì bị lỗi. Bản trước Snow Leopard thì ko làm sao cả! lỗi khi mở Finder vào phần document và chọn view theo list (vì trong document này có rất nhiều folder và file) thì hay xảy ra tình trạng ko thấy file đâu cả, trở về thư mục Home cũng ko thấy gì! phải restart máy lại mới thấy đc.
Có vẻ như bản Lion này thực sự chưa ổn định. Ngay cả khi sử dụng Skype để voice cũng hay bị treo, camera đứng hình. Chắc rảnh rỗi cho về lại Snow Leopard thôi!

Hồi đêm cài lại máy cho cô Lan, cài bản Windows 7 SP1 mới down đc, chạy có vẻ tốt! tuy nhiên lại phát sinh vấn đề khi restore máy bằng Acronis.
Sau khi restore xong thì ko thể boot vào Windows 7 đc, mà phải bỏ đĩa setup Windows vào để repair thì mới vào Windows đc bình thường.
Nguyên nhân là do phân vùng 100MB tự tạo khi setup Windows 7, giải pháp là merge phân vùng này vào phân vùng cài Windows 7 là xong! tuy nhiên máy này bị setup password BIOS, vì thế k thể boot bằng hirent để làm!
Vẫn còn 1 cách, là xoá bỏ phân vùng này khi cài. Vậy là mắc công cài Windows lại 1 lần nữa :sad:

Coi như rút kinh nghiệm vậy.

Giờ kiếm nhạc nghe đợi hết giờ vậy

2011/09/14

Windows 8

Posted in by HungNguyen | Edit
Hôm nay Microsoft đã cho phép download phiên bản Windows 8 Developer Review để sử dụng thử tính năng mới, có thể download tại địa chỉ http://msdn.microsoft.com/en-us/windows/home/ (mình download bản 32-bit dung lượng 2.8GB)
Sẵn có máy trống, xách ra cài thử xem ntn :D Máy đem cài chạy CPU E5700, DDR3 2GB. Cài đặt trực tiếp từ Windows 7.
Quá trình cài đặt khá nhanh (nhanh hơn Windows 7) và ko có tùy chọn format ổ đĩa (do cài trực tiếp trên Windows 7)
Video giới thiệu Windows 8 Build


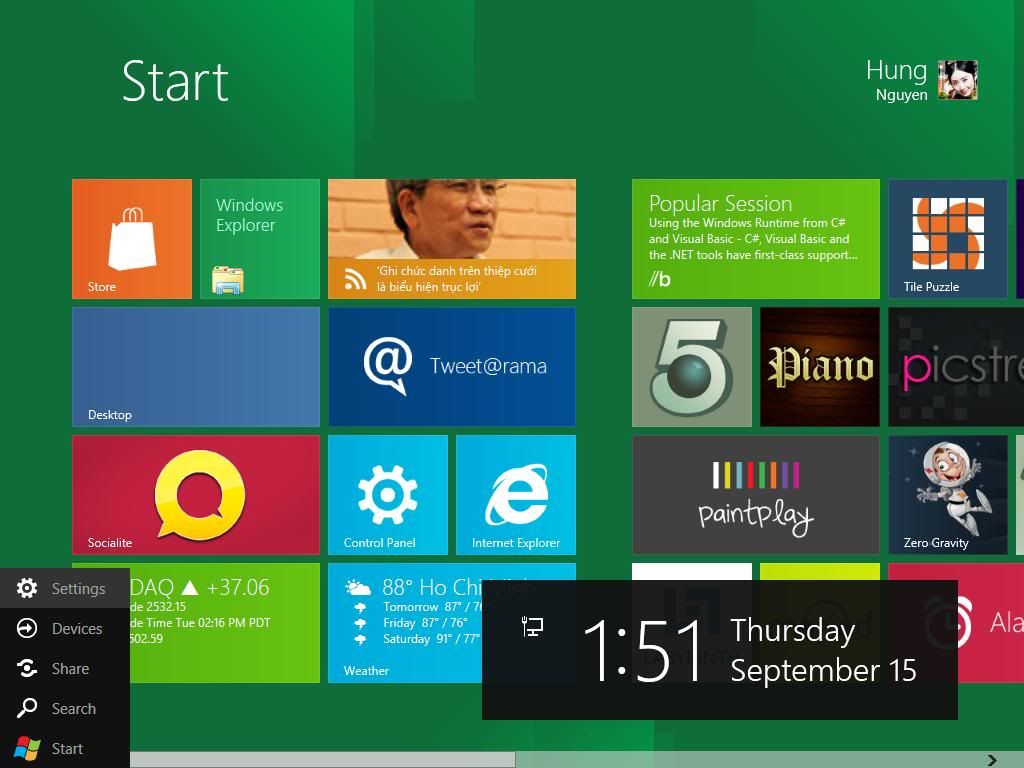
Một số hình ảnh Windows 8 Developer Review sau khi cài đặt xong

2009/09/13

LG Network Monitor

Posted in by HungNguyen | Edit
Tại triển lãm IFA 2009 ở Berlin (Đức) vừa qua, Hãng LG đã giới thiệu hệ thống Network Monitor sử dụng phần mềm vSpace cho phép 11 người dùng sử dụng chung 1 PC trong phạm vi 10m.

Phiên bản mới nhất của hệ thống này đã có mặt tại Mỹ và sẽ tiếp tục có mặt trên thị trường châu Âu trong tháng 9. Thế hệ kế tiếp của hệ thống sẽ tăng số người dùng chia sẻ lên đến 30 và gia tăng giới hạn khoảng cách vật lý bằng cách kết nối các màn hình (monitor) vào máy tính chủ (host PC) thông qua một mạng Ethernet.

Dạng hệ thống chia sẻ máy tính ảo hóa này không mới nhưng LG đã cải tiến theo nhu cầu thực tiễn. Ưu điểm đầu tiên của hệ thống là giúp tiết kiệm chi phí triển khai một mạng máy tính nhỏ như phòng học, chỉ mua 1 PC và nhiều màn hình, bàn phím với chuột rồi sử dụng chung thay vì mua 11 bộ PC riêng lẻ. Hệ thống chia sẻ dạng này giúp tiết kiệm điện năng tiêu thụ, tiết kiệm thời gian xử lý, cài đặt bản vá hay phần mềm cho các máy trong hệ thống mạng. Nhân viên IT chỉ cần thao tác trên một PC duy nhất thay vì nhiều máy.

Phần mềm sử dụng cho hệ thống là vSpace của NComputing được cài đặt lên máy chủ, cho phép quản trị viên cài đặt thông tin cho từng người dùng và quyết định mỗi người dùng sẽ có quyền truy xuất đến chương trình nào. Nhờ áp dụng mô hình này mà NComputing đã giành được nhiều hợp đồng cung cấp giải pháp trước máy tính xách tay giá rẻ OLPC và Intel Classmate PC tại các nước đang phát triển. ("Intel và OLPC thất bại trước NComputing tại Ấn Độ")

Hiện tại, hệ thống vẫn còn bị hạn chế bởi nhiều hạn mức xử lý nên danh sách các bộ phần mềm được cài đặt cũng còn khá ít trong đó có Microsoft Office. Có thể sử dụng để huấn luyện học sinh thực tập làm quen với máy tính và bộ ứng dụng văn phòng tại các trường học.

vSpace có thể hoạt động được trên hệ điều hành Windows lẫn Linux. Máy chủ cần có cấu hình tối thiểu bao gồm BXL lõi tứ (quad-core) 2.66GHz, bộ nhớ RAM 4GB để có thể hỗ trợ nhiều người dùng. Hệ thống Network Monitor có 2 dạng là N-series và Nplus-series (cao cấp hơn) sẽ được LG bán ra vào đầu năm 2010.
TTO
2007/09/17

DOS OS for Newbie

Posted in by HungNguyen | Edit
Đây là bài viết hướng dẫn những câu lệnh trong hệ điều hành Ms Dos. Bài viết mình sưu tầm ở trong CD Lê Hoàn và cũng thấy trong diễn đàn HVA.
http://hagianghi.googlepages.com/dos.txt